Pages

Thursday, March 31, 2011

Sign Language

Sign Language is the perfect way to help the communication process along with your children.
Many kids are able to sign long before they can speak!

This post will cover tips on using sign language with your children, instructions on how to sign some early and everyday signs, and my recommended home video's.

Tips on Using Sign Language
Keep these tips in mind as you and your child begin using signs.

Use signs that are useful for your child and a part of his life.
If the signs aren't useful, your child won't learn them or use them.

Be sure that you have your child's attention when you sign to him or show him signs.

Use the sign and word(s) together.
Repeat words verbally after your child signs them to reinforce the spoken word.

Use the signs that your child is learning in as many situations as possible.
Your child needs to see a sign many times and understand them before he will try to sign them.

Accept your child's signing attempts and try not to over-correct.
As your child begins to use signs, he may have difficulty making the sign because he can't form his hands in the shape of the sign.

Try not to anticipate your child's needs before he does.
Leave enough time for your child to recognize and express his need to communicate.

Start teaching as early as 6 months.
You can start signing when your baby is between 6 and 8 months and holds your gaze for a few seconds.

How to Sign Early and Everyday Signs

Milk: Hold your hand out in front of you - open and close in a squeezing motion (like milking a cow).


Eat/Food: close your fingers to your thumb and tap fingertips against your lips

More: close your fingers to your thumb (on both hands) and tap fingertips together.


Drink: Position hand like it is holding a cup, and "take a drink"

Finished / All Done: Hands out with palms facing you - then turn them over so palms face away
Please: Palm rubs on chest in circle

Thank You

Thank You / Your Welcome: Move open hand from your chin, going down


Play: Both hands with thumb and pinkie outstretched, and shake

Ball
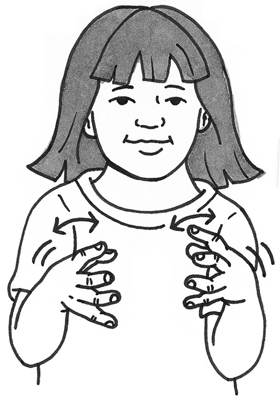
Ball: Claw hands to form a ball shape.  Rotate hands alternately.

Stop: One hand moves down and is stopped by the other hand (palm up)

Help: Thumbs up on top of one hand, and move them both up
Mom: Outstretched hand, thumb taps your chin
Dad: Outstretched hand, thumb taps your forehead

Signing Time
If you are unfamiliar with the Signing Time Series, it is definitely worth checking out (see the links to Amazon on the right hand side bar as well).
They are 30 minute dvd's that teach children how to sign.
My boys LOVE them, and they were an absolute life saver with Cannon - if they impact Lincoln half as much as they did him I will be a happy mama.

Thursday, March 17, 2011

How to Make a Dinosaur Cake

I am just going to give a warning before you read this post.
This is simply how to MAKE a very easy dinosaur cake,
NOT how to DECORATE the cake.
For Cannon's 5th Birthday I let him decorate his own cake.
Which if you ask me was the best part of the whole thing!

Here is the finished result:
How to Make a Dinosaur Cake

And here's how to do it:
You will need:
1 cake mix (I used one from a box)
- One 8 or 9" cake pan
- Muffin Tin
- 1 small - medium glass (ovenproof) bowl

Prepare the cake according to the package directions.

Thoroughly spray the bowl, cake pan and 4 muffin cups with cooking spray.

Use half of the batter to fill up the 8-9" cake pan.

Fill 4 muffin cups with batter

Pour the remaining batter into the ovenproof glass bowl (make sure you use a bowl that is large enough - you don't want cake flowing over the edge.  I put mine on a cookie sheet just to be safe).

It should look something like this:

Now put those all in a 350 degree oven.
** Note that the cooking times are going to be different for each.  Check the cake box for cooking times for the cupcakes and round.
I put them all in at the same time, and took the cupcakes out as soon as they were done, and then took the cake pan out when it was done, and finally took out the bowl.

The bowl is going to have to cook for the longest amount of time, since it will be the thickest.  I had to cook mine for about 40 minutes.  Just poke a butter knife in there and make sure that it comes out clean (same as the toothpick concept).

Let everything cool completely.

Now for the assembly:
The bowl cake is going to go down first, and will be the main body of the dinosaur.  I used frosting to hold it in place.
(**You may have to cut the top of the cake to ensure that it is flat)

Cut the tops off of the cupcakes, leaving them in-tact and set aside.
Now cut each cupcake in half, making a moon shape so it will fit around the body (they are going to be the hands and feet):

Now use the cupcake tops to form the head and the neck:
One top is cut in half to form the neck.
The other half of that piece connects to the neck to hold up the head (the 'nose' and 'head' are each one cupcake top).

Now use your round cake and cut out a tail.  I followed along the edge so the tail would curl around, like so:

And there you have it!
Cannon wanted it blue with green, so we used blue frosting with green sprinkles:

He also informed me that it needed "spikes", which ended up being chocolate covered almonds.
He went a little spike crazy but he had a great time doing it and he LOVED the end result!

He spent a long while admiring his work...

Happy Birthday Cannon!

Thursday, March 3, 2011

Sensory Activites and Ideas

This is another handout that follows up with what I posted about last week (Tactile, Vestibular and Proprioceptive Sensory Integration).
It is basically a list of activities that are good for causing awareness to the 3 senses listed above (a lot of them are just great ideas for kids activities in general!)

Sensory Activities and Ideas

Tactile (touch):
- Texture bucket: fill it full of rice, beans, cheerios, uncooked pasta, beads, cream of wheat, sand.  Very similar to the Bean Box idea.

- Touching a variety of textures, such as: pieces of carpet, soft cloth, sand paper, scouring pad, sponge, koosh toys, bean bags, paint brush, feather duster, turkey baster,finger puppets, stress ball, Gak, sand, rice, beans, egg-crate mattress, fake fur, foam pieces, grass, sand/dirt, corduroy, cotton, wool.

- Massage: hands, arms, feet, and cheeks as tolerated.

- Water play: indoors or outdoors.

- Lotion: rubbing lotion (scented) on arms, hands and feet.

- Finger paint: use pudding, Jell-O, whip cream, shaving cream, warm and cold pudding, etc.

- Gluing textures as part of a craft project: glue rice, beans, fabrics, sand, macaroni, etc.

- Hidden Objects: hide toy in foam beans, rice, Easter grass, etc. and have the child dig around and look for it.

- Playdough/theraputty: roll putty into snakes, garlic press, cookie cutters, squeeze, pull apart to find hidden objects.

- Cooking with various ingredients and mixing the foods.

- Popping Bubbles

Vestibular (movement):
-  Therapy Ball Activities: bouncing with as much support as needed, rocking in prone and supine; always do it on top of a mat for safety.

- Rocking Board: Sitting, prone and supine.

- General Playground Activities: climbing, swinging, sliding, crawling, etc.

- Swinging: use a variety of swings and positions to vary the stimulation.

- Rolling down a hill or incline.

- Rolling on the mat or floor.

- Blanket Swinging, or being pulled on a blanket.

- Scooterboard activities: either pushing/pulling the resident or doing it themselves.

- Rocking on lap or in a rocking chair.

- Bouncing on lap.

- Slides: for residents with enough strength and sitting balance

- Swimming

- Riding in a stroller or wagon
- Bouncing/jumping on a trampoline or mattress

- Sit n' Spin

- Riding a bicycle/trike
Proprioceptive (deep pressure):
- Brushing and Joint compression program (trained by OT or OTA).
- Deep pressure massage to various body parts.

- Scooterboard Activities: either pushing/pulling the resident or doing it themselves.

- Weighted vest or blanket (to be worn no longer than 20 minutes at a time).

- Wrist or ankle weights for body awareness.

- Steamroller games with bolster.

- Pushing/pulling heavy objects, such as wagons, carts, boxes, furniture

- Wheelbarrow walk

- Trampoline: jumping or being gently bounced.
- Kicking a medium-sized ball.

- Beanbag games (catching / throwing).

- Squeezing sponges in water.

- Squeezing playdough

- Bean bag chair

- A safe haven (small tent with pillows) to self-calm.
- Arm wrestling

- Bike or Tricycle riding
Visual:
Always darken the room when working with a lighted activity to increase the contrast.  Avoid rapid, flashing lights and strobe lights as they can induce seizures.

- Light Box Activities: use different colors, shapes, patterns, etc.

- Suspend a ball over child's head while lying on back.  Child follows lateral, vertical, diagonal, and circular movements of the ball.

- Flashlight - move flashlight around a darkened room.  Have children follow it by pointing or stepping on it.  Place a colored cloth over the flashlight for variation.

- Glittery and shiny objects / toys.

- Mirror Games: have the child look at themselves and other objects in the mirror.

- Encourage playing with puzzles, mazes, dot-to-dot pictures, hidden-picture games, and picture books, one page at a time.

Auditory:
- Reading stories out-loud to the residents (great group activity)
- Cordless Headphones for group auditory stimulation / activities.

- Playing copy-cat: try to get the residents to imitate sounds you make; copy their noises first to get it started.

- Soft Music and Nature Sounds (cd's)

- Upbeat, fast music.  Find music that each resident enjoys.

Smells:
Always describe and talk about the scents as they are presented.

- Scent bottles: present just 2-3 different smells over one session to avoid over-stimulation.

- Scented markers

- Cooking Activities, discussing smells of foods at mealtime.

Compiled by Paul Daybell, OTR 

Thursday, February 24, 2011

Sensory Integration

This handout was VERY interesting to me.  It touches on points that I had never thought of, like how we all have 2 other senses in addition to the 5 we normally talk about; vision, hearing, taste, smell and touch.

Sensory Integration

What is sensory integration?
- Sensory Integration: the neurological process that organizes sensation from one's own body and from the environment and makes it possible to use the body effectively within the environment (Ayres, 1988).  We constantly receive input through our various senses, our brain then registers and interprets the input and we then act accordingly.

- Sensory Processing: the process of the brain receiving, interpreting and organizing input from all of the active senses at any given moment.

What sensory systems do we use everyday, all the time?
- The "usual" 5 senses, which are: vision, hearing, taste, smell and touch (tactile)

- The 2 other less-known senses: Vestibular (movement) and Proprioception (deep pressure)

- All of the different senses can have difficulties; however, the majority of "sensory integration" problems come from the Tactile, Proprioceptive and Vestibular senses.

- Tactile: the sensation of touch, allows people to manipulate objects in a refined manner, feel input throughout our body through receptors in the skin.

- Vestibular: is basically the "equilibrium" system that allows people to detect movement and is comprised of 3 semi-circular canals which detect and register movement and gravity receptors (utricle/sacule).

- Proprioception: this is usually subconscious information the brain receives from our muscles and joints.  This information tells us where our body parts are in space.  It allows us to walk, run, jump and generally move in a coordinated manner.

What happens when there are problems in these areas?
- With each of these senses, there is "normal" range of functioning.  Problems occur when people interpret the information they receive through their senses either too highly (hypersensitive) or too lowly (hyposensitive).

- Hypersensitive or over reactive systems: the individual's body and/or brain interprets incoming sensory stimulation as overwhelming or way too much and they become resistive or defensive to this input.

- Hyposensitive or under reactive systems: the individual's body and/or brain interprets incoming sensory stimulation as under arousing or way too little and they don't register it or feel it.

Typical sensory integration difficulties:
- Tactile: when there is a problem, usually people are hypersensitive to the feeling of being touched or certain textures touching their skin.  Many times, people are more sensitive on their hands, feet and around and in their mouth (orally-defensive).

- Vestibular: with movement, problems can arise on both extremes.
          1. Hypersensitive: intolerance to movement or a fear of falling/heights (gravitational insecurity).  This can lead to becoming resistive and defensive to movement activities and having their feet off of the ground.  They may become physically sick/nauseated with normal amounts of movement.
          2. Hyposensitive: the brain fails to register the movement appropriately; therefore, the individual will then seek additional movement by initiating excessive movement, such as rocking, spinning, swinging, etc.  The individual may also have difficulty with postural responses, balance and bilateral coordination.

- Proprioceptive: The brain has difficulty registering the deep pressure input appropriately (hyposensitive); therefore, these individuals seek additional deep pressure by bouncing, jumping, rocking hard in a chair, "crashing" into objects, seeking tight spots in which to squeeze themselves, etc.  Treatment includes setting up a variety of deep pressure activities (sensory diet) that fulfill this need in an appropriate way and hopefully decrease the "seeking" behavior.

- Children can be hyper or hypo-sensitive to visual, auditory, tastes, smells also.  These are more obvious by the behavior they exhibit, either seeking or avoiding the specific sensory stimulation.

- Dyspraxia or "motor planning": difficulty with the ability to conceive, organize and execute a sequence of actions that are new and unfamiliar.  The ability to execute a new motor action is accomplished through the coordination of the tactile, vestibular and proprioceptive senses.  Individuals with dyspraxia are often clumsy and uncoordinated.

Treatment:
- To provide sensory stimulation in an active, controlled and safe manner to allow the person to learn to experience these sensations with success.  The individual must first trust the situation and actively participate in the activity and then gradually work through a variety of sensory experiences and increase their tolerance to the activity and sensory input.

- Find out what the individual tolerates and does not tolerate in each sensory area and then set up a plan to work on those items/activities tolerated first and then gradually vary the input.  Go slowly and make sure the person is comfortable before taking the next step.

- Many individuals with physical disabilities are unable to move and experience various sensations.  Therefore, often they enjoy being assisted in experiencing vestibular (movement), proprioceptive (deep pressure), tactile and other sensory input.

- For those children that seek or crave sensory input, give it to them as part of their "sensory diet" in a hope that it will decrease the inappropriate "seeking" behavior.  This is a good time to work on more appropriate social interaction, eye contact, requesting and vocalizations.

Compiled by Paul Daybell, OTR


Next week I will post an article on Sensory Activities and Ideas.

Thursday, December 9, 2010

Yarn Octopus

I have a box in my office, and I try to keep it stacked with bagged activities in case I am ever in the need of something instantly.

Well, the other day Cannon asked to play with an octopus.
I didn't have one of those lying around.

But I did have the materials to make one in my handy little box:

Materials Needed:
- Yarn
- Ribbon (to tie around neck)
- Two small buttons (for the eyes)
- String (for the smile)
- small ball (ping-pong or golf ball size)

Step 1:
Cut 24 pieces of yarn into equal lengths (about 1 1/2 - 2 feet long)
Make them into a spider web.

 Wrap the middle section around your ball and tie the neck off with your ribbon:

Glue the eyes and mouth on.
You should have enough strings to make 8 braids (6 strands per braid).

I pretty much won the "awesome mom of the day award" for actually producing an octopus upon request.
It was pretty easy, too.

Thursday, December 2, 2010

Developmental Ages for Sound and Speech Development


http://communicationconnects.com/parent.htmHere are some helpful resources to let you know all about speech and language development pertaining to your young one(s).
This post will go over what sounds come first, what to expect by certain ages, as well as examples that will help you understand what kind of sounds and words they should be saying.

What Sounds Come First?
Written by Elaine L. Hicken, MS, CCC-SLP (2/96)

The first vocalizations a child makes are vowel-like sounds.  These are the easiest sounds to produce.

The respiration needed for speech is much different from quiet breathing.  Quiet breathing is easier than breathing for speech, because fewer muscles are required.  For speech, the diaphragm and muscles of the rib cage and between the ribs pull the ribs out and up to draw air into the lungs then the muscle of exhalation push the extra air that is needed for speech out of the lungs.  Respiration for speech develops as the child learns to push up with their arm, sit, crawl, stand, and walk.  Newborns breath from their "belly".  By about 12 months they primarily use chest breathing as they begin to stand and walk.

Consonant sounds are made by either stopping the air in the oral cavity (p, b, t, d, k, g) or letting it glide through restricted areas formed by using the lips, tongue, teeth, and palate (f, v, s, z, th).  Some consonant sounds require a stopping and a gliding action (j, ch).

There are three sounds that are made by forcing air through the nasal cavity and out the nose.  Air is prevented from coming out the mouth with the lips to form the /m/ sound.  The air is stopped with the tongue and palate to produce the /n/ sound.  The air is blocked in the back of the mouth with the base of the tongue and palate to form the /ing/ sound.

Some of the sounds used in English are voiced (vocal cords vibrate) and some are unvoiced (vocal cords remain open).  There are several consonant sounds that are made exactly the same way with the exception of voicing.  These are called pairs.  Some examples of pairs for consonant sounds include /p/ and /b/, /t/ and /d/, /d/ and /g/, /f/, and /v/, /th/ and /th/, /sh/ and /j/, /s/ and /z/.

Our brains have to program all of the necessary structures to preform simultaneously in order for a sound to be made correctly.  There are some sounds that are easier to make than others.  These sounds develop first, with the more complex sounds developing later.  It is not uncommon for a child to substitute an easier sounds for a more complex sound until he or she learns the correct sound.

This chart shows the sounds that should be mastered by the given ages.  If a child is not able to produce the sounds listed at his or her age level they may need some extra help.
A speech language pathologist may be contacted to offer help and suggestions.

Developmental Ages for Sound Development
(Utah Office of Education, Comminucation Disorders Guidelines, December 1991)

Speech Development: What to Expect

A toddler's mother is often the only person who understands much of what the toddler says.  The ability to correctly articulate the sounds in the English language develops at a varying rate in typical children.
The following describes the range of ages for mastery of consonant sounds.

Acquisition of Consonant Sound

This chart shows the average age estimates and upper age limits of customary consonant production.  The solid bar corresonding to each sound starts at the mediam age of customary articulation; it stops at an age level at which 90% of all children are customarily producing the sound.

(From Templin, 1957: Wellman et al., 1931.)
Source: Sander, Eric K. When Are Speech Sounds Learned?  JSHD, 37(1), 55-62, February 1972.

For more specific inquiries, try the following links:

LD Online: Speech & Language

Communication Connects

Thursday, November 18, 2010

Thankful For Turkey

This is an excellent idea that will help bring the 'spirit' of Thanksgiving to your house all month long (or however long you would like).

The idea is to put a picture of a turkey up on a wall in your home.  We put ours on the front door, so the boys would be reminded of it often.

You could draw your own, or just print one from the internet.


We colored our printed turkey, then we cut out several feathers, in coordinating colors.

Once a day, we would talk about things that we are grateful for.  We would then pick one blessing, and write it down on a feather.

We started at the beginning of the month, and had Cannon do one feather per day, but this could easily be done in a single day or over any amount of time.

This would also be a good Thanksgiving Day activity; especially if you were having a large group of people.  Everyone could have a feather and write down something that they were thankful for.

I think this is going to turn into an annual tradition at our house.  I am really enjoying it so far!