Pages

Thursday, March 31, 2011

Sign Language

Sign Language is the perfect way to help the communication process along with your children.
Many kids are able to sign long before they can speak!

This post will cover tips on using sign language with your children, instructions on how to sign some early and everyday signs, and my recommended home video's.

Tips on Using Sign Language
Keep these tips in mind as you and your child begin using signs.

Use signs that are useful for your child and a part of his life.
If the signs aren't useful, your child won't learn them or use them.

Be sure that you have your child's attention when you sign to him or show him signs.

Use the sign and word(s) together.
Repeat words verbally after your child signs them to reinforce the spoken word.

Use the signs that your child is learning in as many situations as possible.
Your child needs to see a sign many times and understand them before he will try to sign them.

Accept your child's signing attempts and try not to over-correct.
As your child begins to use signs, he may have difficulty making the sign because he can't form his hands in the shape of the sign.

Try not to anticipate your child's needs before he does.
Leave enough time for your child to recognize and express his need to communicate.

Start teaching as early as 6 months.
You can start signing when your baby is between 6 and 8 months and holds your gaze for a few seconds.

How to Sign Early and Everyday Signs

Milk: Hold your hand out in front of you - open and close in a squeezing motion (like milking a cow).


Eat/Food: close your fingers to your thumb and tap fingertips against your lips

More: close your fingers to your thumb (on both hands) and tap fingertips together.


Drink: Position hand like it is holding a cup, and "take a drink"

Finished / All Done: Hands out with palms facing you - then turn them over so palms face away
Please: Palm rubs on chest in circle

Thank You

Thank You / Your Welcome: Move open hand from your chin, going down


Play: Both hands with thumb and pinkie outstretched, and shake

Ball
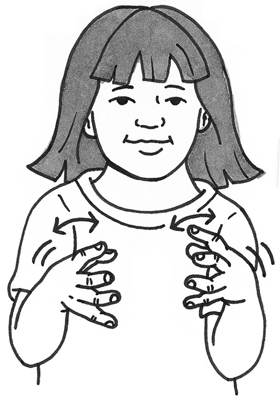
Ball: Claw hands to form a ball shape.  Rotate hands alternately.

Stop: One hand moves down and is stopped by the other hand (palm up)

Help: Thumbs up on top of one hand, and move them both up
Mom: Outstretched hand, thumb taps your chin
Dad: Outstretched hand, thumb taps your forehead

Signing Time
If you are unfamiliar with the Signing Time Series, it is definitely worth checking out (see the links to Amazon on the right hand side bar as well).
They are 30 minute dvd's that teach children how to sign.
My boys LOVE them, and they were an absolute life saver with Cannon - if they impact Lincoln half as much as they did him I will be a happy mama.

Thursday, March 17, 2011

How to Make a Dinosaur Cake

I am just going to give a warning before you read this post.
This is simply how to MAKE a very easy dinosaur cake,
NOT how to DECORATE the cake.
For Cannon's 5th Birthday I let him decorate his own cake.
Which if you ask me was the best part of the whole thing!

Here is the finished result:
How to Make a Dinosaur Cake

And here's how to do it:
You will need:
1 cake mix (I used one from a box)
- One 8 or 9" cake pan
- Muffin Tin
- 1 small - medium glass (ovenproof) bowl

Prepare the cake according to the package directions.

Thoroughly spray the bowl, cake pan and 4 muffin cups with cooking spray.

Use half of the batter to fill up the 8-9" cake pan.

Fill 4 muffin cups with batter

Pour the remaining batter into the ovenproof glass bowl (make sure you use a bowl that is large enough - you don't want cake flowing over the edge.  I put mine on a cookie sheet just to be safe).

It should look something like this:

Now put those all in a 350 degree oven.
** Note that the cooking times are going to be different for each.  Check the cake box for cooking times for the cupcakes and round.
I put them all in at the same time, and took the cupcakes out as soon as they were done, and then took the cake pan out when it was done, and finally took out the bowl.

The bowl is going to have to cook for the longest amount of time, since it will be the thickest.  I had to cook mine for about 40 minutes.  Just poke a butter knife in there and make sure that it comes out clean (same as the toothpick concept).

Let everything cool completely.

Now for the assembly:
The bowl cake is going to go down first, and will be the main body of the dinosaur.  I used frosting to hold it in place.
(**You may have to cut the top of the cake to ensure that it is flat)

Cut the tops off of the cupcakes, leaving them in-tact and set aside.
Now cut each cupcake in half, making a moon shape so it will fit around the body (they are going to be the hands and feet):

Now use the cupcake tops to form the head and the neck:
One top is cut in half to form the neck.
The other half of that piece connects to the neck to hold up the head (the 'nose' and 'head' are each one cupcake top).

Now use your round cake and cut out a tail.  I followed along the edge so the tail would curl around, like so:

And there you have it!
Cannon wanted it blue with green, so we used blue frosting with green sprinkles:

He also informed me that it needed "spikes", which ended up being chocolate covered almonds.
He went a little spike crazy but he had a great time doing it and he LOVED the end result!

He spent a long while admiring his work...

Happy Birthday Cannon!

Thursday, March 3, 2011

Sensory Activites and Ideas

This is another handout that follows up with what I posted about last week (Tactile, Vestibular and Proprioceptive Sensory Integration).
It is basically a list of activities that are good for causing awareness to the 3 senses listed above (a lot of them are just great ideas for kids activities in general!)

Sensory Activities and Ideas

Tactile (touch):
- Texture bucket: fill it full of rice, beans, cheerios, uncooked pasta, beads, cream of wheat, sand.  Very similar to the Bean Box idea.

- Touching a variety of textures, such as: pieces of carpet, soft cloth, sand paper, scouring pad, sponge, koosh toys, bean bags, paint brush, feather duster, turkey baster,finger puppets, stress ball, Gak, sand, rice, beans, egg-crate mattress, fake fur, foam pieces, grass, sand/dirt, corduroy, cotton, wool.

- Massage: hands, arms, feet, and cheeks as tolerated.

- Water play: indoors or outdoors.

- Lotion: rubbing lotion (scented) on arms, hands and feet.

- Finger paint: use pudding, Jell-O, whip cream, shaving cream, warm and cold pudding, etc.

- Gluing textures as part of a craft project: glue rice, beans, fabrics, sand, macaroni, etc.

- Hidden Objects: hide toy in foam beans, rice, Easter grass, etc. and have the child dig around and look for it.

- Playdough/theraputty: roll putty into snakes, garlic press, cookie cutters, squeeze, pull apart to find hidden objects.

- Cooking with various ingredients and mixing the foods.

- Popping Bubbles

Vestibular (movement):
-  Therapy Ball Activities: bouncing with as much support as needed, rocking in prone and supine; always do it on top of a mat for safety.

- Rocking Board: Sitting, prone and supine.

- General Playground Activities: climbing, swinging, sliding, crawling, etc.

- Swinging: use a variety of swings and positions to vary the stimulation.

- Rolling down a hill or incline.

- Rolling on the mat or floor.

- Blanket Swinging, or being pulled on a blanket.

- Scooterboard activities: either pushing/pulling the resident or doing it themselves.

- Rocking on lap or in a rocking chair.

- Bouncing on lap.

- Slides: for residents with enough strength and sitting balance

- Swimming

- Riding in a stroller or wagon
- Bouncing/jumping on a trampoline or mattress

- Sit n' Spin

- Riding a bicycle/trike
Proprioceptive (deep pressure):
- Brushing and Joint compression program (trained by OT or OTA).
- Deep pressure massage to various body parts.

- Scooterboard Activities: either pushing/pulling the resident or doing it themselves.

- Weighted vest or blanket (to be worn no longer than 20 minutes at a time).

- Wrist or ankle weights for body awareness.

- Steamroller games with bolster.

- Pushing/pulling heavy objects, such as wagons, carts, boxes, furniture

- Wheelbarrow walk

- Trampoline: jumping or being gently bounced.
- Kicking a medium-sized ball.

- Beanbag games (catching / throwing).

- Squeezing sponges in water.

- Squeezing playdough

- Bean bag chair

- A safe haven (small tent with pillows) to self-calm.
- Arm wrestling

- Bike or Tricycle riding
Visual:
Always darken the room when working with a lighted activity to increase the contrast.  Avoid rapid, flashing lights and strobe lights as they can induce seizures.

- Light Box Activities: use different colors, shapes, patterns, etc.

- Suspend a ball over child's head while lying on back.  Child follows lateral, vertical, diagonal, and circular movements of the ball.

- Flashlight - move flashlight around a darkened room.  Have children follow it by pointing or stepping on it.  Place a colored cloth over the flashlight for variation.

- Glittery and shiny objects / toys.

- Mirror Games: have the child look at themselves and other objects in the mirror.

- Encourage playing with puzzles, mazes, dot-to-dot pictures, hidden-picture games, and picture books, one page at a time.

Auditory:
- Reading stories out-loud to the residents (great group activity)
- Cordless Headphones for group auditory stimulation / activities.

- Playing copy-cat: try to get the residents to imitate sounds you make; copy their noises first to get it started.

- Soft Music and Nature Sounds (cd's)

- Upbeat, fast music.  Find music that each resident enjoys.

Smells:
Always describe and talk about the scents as they are presented.

- Scent bottles: present just 2-3 different smells over one session to avoid over-stimulation.

- Scented markers

- Cooking Activities, discussing smells of foods at mealtime.

Compiled by Paul Daybell, OTR