Pages

Thursday, January 28, 2010

Colored Rice


I don't remember where I got this idea... so if you know the source let me know!

Colored Rice

The perfect Non-Toxic alternative to glitter for your young artist!

Materials Needed:
- vinegar
- uncooked white rice
- food coloring
- bowls and spoons

Step 1)
- Get a bowl for each color that you want to make
- Put 1 tsp. of vinegar in each bowl
- Put 10 drops of food coloring in each bowl with the vinegar

Step 2)
- Pour 1 c. of rice into each bowl
- Mix until all the grains of rice have absorbed the coloring

Step 3)
- Pour the rice onto cookie sheets (you ca do more than 1 color per sheet, but do not let them touch)
- Bake at 200 degrees for 45 minutes to dry

You can store them in baggies or plastic containers, but I thought it would be easier for the kids to use if I made shakers...
I took some plastic hot chocolate snap-on lids, and cut the drinking hole large enough so that the rice could come out in controlled quantities.
Then I let Cannon color the cups with different markers, so we would know which color was in each cup... he LOVED helping.
I wrote the color on each cup and then colored the lid.  Then we started filling them up.
Cannon was in charge of the green rice...
This was enough fun in and of itself... He spent at least 15 minutes spooning it into the cup, then dumping it out again. We didn't even get around to actually using it that day.


When we did get around to using it, we had a blast... but made a big mess!
We started by coloring a rainbow.

He wasn't that excited to use the glue, so I helped with that part.  We did one color at a time...
He'd dump out a large pile, and then we would sprinkle them over the glue

Then we tried just using the glue without coloring first.
He thought that was pretty cool...

And of course he got distracted and wanted to play with the green rice... again...

All in all it was pretty fun for him.
We only used a small portion of what we had, so I'm sure we'll be doing this again.
And did I mention that the cups fit perfectly into one of those shoe-box sized plastic containers?
Perfect for storage...

We let the pictures dry overnight.  They turned out awesome; definately fridge worthy:

Tuesday, January 26, 2010

Bubble Cup

This idea was shown to me by my friend Marsha Lima.  My kids love it, and so will yours!

Materials Needed:
- styrofoam cup
- drinking straw
- rubber band
- 4x4" piece of cotton fabric
- squirt bottle
- water
- dish soap

Here's How:
- soak cotton fabric under running water
- ring out so damp but not dripping

- fasten damp rag around cup with the rubber band
- use the straw to make a hole in the cup, just under the fabric

Be sure to make the hole as small as possible, so no air can get in or out around the straw.
It should look something like this...

Then, drizzle some dish soap on top of the fabric...

Use your finger to rub it into the cloth, all around the top of the cup

Next, put the straw through the hole.
Spray the top of the cloth with the squirt bottle, and blow through the straw...

And the bubbles will start coming....

And coming....

And coming!

When the bubbles start to stop, spray the rag with water or apply more soap...

This kept Cannon entertained for well over 30 minutes.
He liked playing in the bubbles after they were all over the table as well...

Needless to say he was not excited to get ready for bed (we should have done this in the afternoon, not after dinner).  But either way, he loved it!


Thursday, January 21, 2010

Card Recognition Game

This was a gift I made for Cannon for his birthday a while back.  We were working on speech therapy at the time, and he needed some motivation.
In the end, it turned out to be a major improvement for his fine motor, speech, and  sign language skills.

 I started with an old baby formula can.  I used some roll on stickers to decorate the can and the lid, and cut a hole in the lid like a piggy bank.

For the cards, I used Microsoft Word to organize all of my pictures.  I downloaded some from the internet, but most were taken from clipart... easy! 
I printed pictures of the alphabet, animals, numbers, foods, objects, and signs I wanted him to learn.

 I made them all about 1x1.5" and printed them out.
I wanted mine to last, so I laminated them. (Try using packaging tape to laminate yourself).

They worked like a charm.  For fine motor: we would have him pick up a card and sign it with his other hand.  Putting the cards through the slotted lid helped too.

His speech improved as he tried to say what was on the card.  Or what sound the animal made, or what color it was.  You could obviously use them for whatever you are working on (or just for fun).  This helped a lot with his sign language as well.

Even if they aren't necessarily learning from the cards, the boys still love to play with them (they make a huge mess throwing them all over the place... or eating them... or whatever else they can think of).

Tuesday, January 19, 2010

Balloon on a String


Everything should come in 2's.  Or 3's, or more, depending on how many kids you have.  Either that or I should be a better teacher on sharing.
Either way, Great Grandma Denna gave the boys a punching balloon.  You know, one of those balloon's on a string, you can use it like a punching bag?

It was a big hit at our house.  Too big.  Too big to share, at least.  They both needed one.

One red balloon and three rubber bands later...
I'm always suprised at how little you need to keep your kids occupied.

He wasn't happy... at first.

He soon got over it...

HIS red balloon turned out to be much better than Lincoln's yellow one.  At least in his mind.

Which tunred out to be great for everyone. since Lincoln was not giving his up!

Thursday, January 14, 2010

DIY Hand/Foot Prints

Want a cute hand/foot print for your child's keepsake?  Without having to pay for it?  Do it yourself!

This was my first experience with salt dough, and it turned out pretty well.  Plus, it is SUPER EASY!  And, your kids will love it!

Materials Needed:
For each print you will need:
2 c. flour
1 c. salt
1 c. water
food coloring
wax paper
cookie sheet
BBQ skewer or pencil
ribbon
marker

Here's How:
- Measure and mix the flour and salt together (Cannon liked this part)


- In a smaller bowl, measure the water and add the food coloring (whatever color you wish).  I did blue and green, and I used 5 drops of food coloring for each.  I was not very impressed with the color - it was more pastel than I would have liked; especially the blue.  For darker colors I would recommend at least 10 drops.

- Pour the water into the salt and flour bowl and mix thoroughly
 
- Mix all ingredients well, kneading until smooth.  The dough should be fairly stiff, not runny or too soft.
- You should be lef with something about this size:

- Form dough into a round smooth ball
- On waxed paper, roll out ball into a circle, about 1/2" thick

- Transfer dough to a cookie sheet
- Press your child's hand (or feet) with fingers splayed into the dough - Cannon doesn't like to get messy, so I was worried about this part... He was completely hesitant at first, but after he realized we were making his hand, he got pretty excited.  Lincoln was less than willing to cooperate at 18 months. I had to redo his a few times... I found it was much easier for me to get him to stand on it.

- Next, use a BBQ skewer or a pencil to make two holes at the top (for the ribbon to go through)

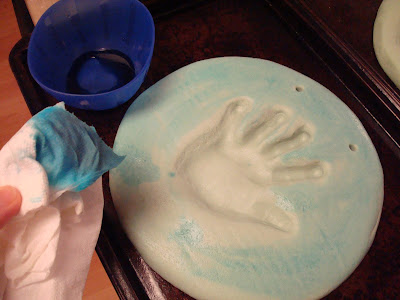
As I mentioned before, I was not happy with the color I came up with. 
I ended up mixing about a tsp. of water with a few drops of food coloring.  Using a paper towel, I 'painted' the water onto the print.  I did everything except the inside of the hand/foot prints.


I think the food color painting made the prints stand out a bit more... and the color was much better!

- Once you have the prints and you've made the holes, bake at 200 for about 3 hours.
- Dough should be fiarly hard but watch to see that it doesn't burn. I baked mine for 3 hours - flipping over after the first 2. The insides of mine looked like they weren't quiet cooked, but I took them out after 3 hours and they turned out just fine.


If my kids could write their own names I would have had them do it, just for the look.  I used a black permanent marker and wrote their names and the date (month and year).  You could write it on the back if you didn't want it to show.

Finally, I strung some ribbon through the holes,
 
Then tied a knot on each end, and folded the edge of the ribbon underneath to get a nice, finished look.

And that's it!  That wall in their room doesn't look quiet as bare, and Cannon gets really excited to see HIS handprint hanging up on the wall.  Too cute!