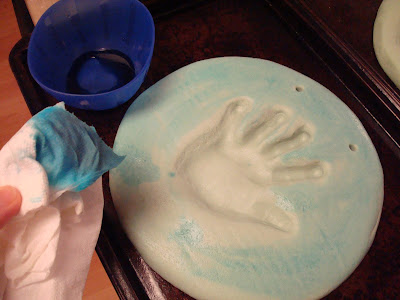
Want a cute hand/foot print for your child's keepsake? Without having to pay for it? Do it yourself!
This was my first experience with salt dough, and it turned out pretty well. Plus, it is SUPER EASY! And, your kids will love it!Materials Needed:
For each print you will need:
2 c. flour
1 c. salt
1 c. water
food coloring
wax paper
cookie sheet
BBQ skewer or pencil
ribbon
marker
Here's How:
- Measure and mix the flour and salt together (Cannon liked this part)
- In a smaller bowl, measure the water and add the food coloring (whatever color you wish). I did blue and green, and I used 5 drops of food coloring for each. I was not very impressed with the color - it was more pastel than I would have liked; especially the blue. For darker colors I would recommend at least 10 drops.
- Pour the water into the salt and flour bowl and mix thoroughly
- Mix all ingredients well, kneading until smooth. The dough should be fairly stiff, not runny or too soft.
- You should be lef with something about this size:
- Form dough into a round smooth ball
- On waxed paper, roll out ball into a circle, about 1/2" thick
- Transfer dough to a cookie sheet
- Press your child's hand (or feet) with fingers splayed into the dough - Cannon doesn't like to get messy, so I was worried about this part... He was completely hesitant at first, but after he realized we were making his hand, he got pretty excited. Lincoln was less than willing to cooperate at 18 months. I had to redo his a few times... I found it was much easier for me to get him to stand on it.
- Next, use a BBQ skewer or a pencil to make two holes at the top (for the ribbon to go through)
As I mentioned before, I was not happy with the color I came up with.
I ended up mixing about a tsp. of water with a few drops of food coloring. Using a paper towel, I 'painted' the water onto the print. I did everything except the inside of the hand/foot prints.
I think the food color painting made the prints stand out a bit more... and the color was much better!
- Once you have the prints and you've made the holes, bake at 200 for about 3 hours.
- Dough should be fiarly hard but watch to see that it doesn't burn. I baked mine for 3 hours - flipping over after the first 2. The insides of mine looked like they weren't quiet cooked, but I took them out after 3 hours and they turned out just fine.

If my kids could write their own names I would have had them do it, just for the look. I used a black permanent marker and wrote their names and the date (month and year). You could write it on the back if you didn't want it to show.
Finally, I strung some ribbon through the holes,
Then tied a knot on each end, and folded the edge of the ribbon underneath to get a nice, finished look.
And that's it! That wall in their room doesn't look quiet as bare, and Cannon gets really excited to see HIS handprint hanging up on the wall. Too cute!


May I know whether you bake them at 200F or 200C?
ReplyDelete200 F
ReplyDelete